RUBEN
FONG WEI JAY | PORTFOLIO
Module 3- Pattern vs Surface


Fig. 3.01 Photographs of final model
For this module, I was given a terrain, a small portion of Tasmania where it required me to create patterns and generate developable surfaces using Rhino 6. The module aims to teach me how to manipulate the topography on Rhino 6 followed by physical model making. Through the workshops and in my own time, there were experimentations to familiarise myself using paneling tools. Finally, it was for oneself to understand the intent behind the design and knowing how to present it to the audience.

Initial Stage: Introduction to Panelling
Through the workshops, I was introduced to the basic Rhino 6 commands. I have learned to generate various types of panels as shown in the figure. The initial phase was simple and easy to follow as it did not require much attention to it for the most part.
Fig. 3.01 Basic Paneling Tool Variations
Understanding Offset Grid Points


Fig. 3.02 Offset Points Experimentations
It was starting to get interesting from this point onwards. Depending on the location of attractor points, be it towards or away and all other variations, the direction of the pyramid differs. It was through this stage, I was able to see patterns and was curious to see how much more can be done. I feel that the module pushed me to try my best in discovering the limitations of the software we use.


Component Creation
Fig. 3.03 Creating of Components
At this point, I had an idea, an inspiration from a lotus plant in a pond. I looked through several images online and was able to have a clearer direction in my design. Hence, I made the components to mimic the blossoming of a flower and seed of the lotus. The idea of opening up/breaking into smaller components, splitting them apart.


Fig. 3.04 My 6 Components showing the Blossom


Generating 3d Panel Custom Variables
From the inspiration of the lotus flower, I tried my ways of getting the right results but to no avail, I was unable to fully manipulate the points. However, seeing the components adjacent to each other was much more crucial as the finalize design may not turn out the way I wanted. Through this segment, I was able to improve on which components can be more dramatic or less dramatic. Some final adjustments were made.
Fig. 3.05 Custom Panels with Custom Components

Fig. 3.06 Back to Attractors
Back to Basics
After heaps of attempt, I finally figured out the best way to create the lotus flower as well as respecting the base terrain that was given. Through curve attractors and shuffle grid as shown, I have finalized the design.
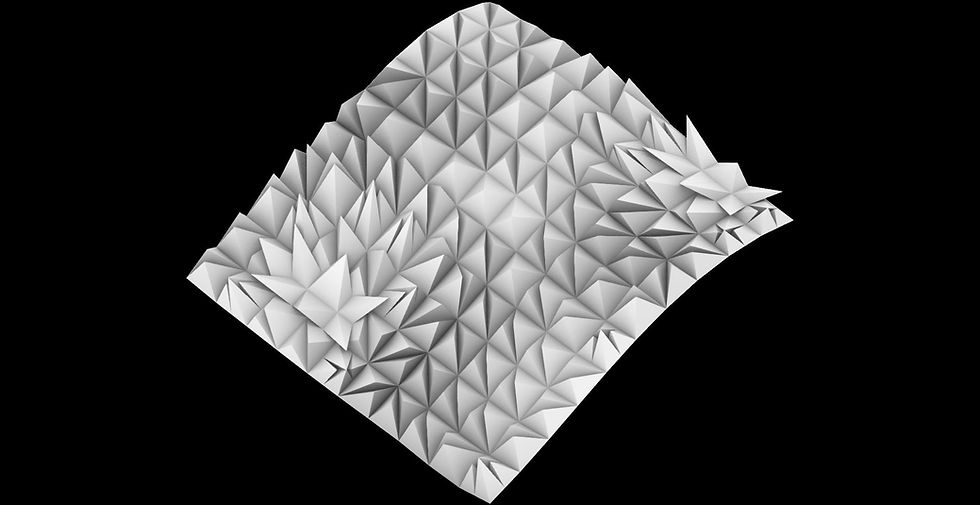
Fig. 3.07 Final Design
As you can see, there are two flowers on both corners. The bottom left acts as the main focal point where the intent was to draw the attention to it right away. Like looking across a beautiful lake, you'll notice the bright colored flowers swaying above the calm waters. You would see the shape of the petals, the seeding of the lotus. Another flower floats away from a further distant, drawing your eyes towards the vast open waters.
Unrolling Individual Components


Fig. 3.08 Unrolling Surface
At this stage, I was required to unroll the 100 components as shown above and have it printed for model making. To my surprise, some components were not developable and as such, needed adjustments. For instance, breaking 1 component into 4.


Model Making
Fig. 3.09 Model Making Process
It was a drastic difference in the amount of time taken to complete the model compared to the estimated time I had planned. Which made me stayed up on many nights to finish it. On one of these nights I wished I had more hands to work with. It tiring but was fun at the same time.

Model Photographed
The main thing about the lighting was to shine on the focal point (the lotus flower) where light dissolves to the back. I had the lighting on a low angle to create dramatic shadows that showcased the lines.

Fig. 3.10 Top View
Reflection
The sleepless nights tested my endurance. I wondered how one could dive right into the project without proper planning of time. What was planned to be 15mins for each component of the model turned out to be longer than I had expected? Failing to plan is planning fail. The saying is right. Had I made more mistakes in planning my time, I may not have finished my work at all. It was great that I was given the opportunity to improve my crafting skills. I never was good with handling sharp objects as I feared them over a small accident when I was young. Thankfully, I have gotten better at it growing up.
Through this module, I could see that the second module had played a part in the third module, aiding me to think differently. I wondered about how my model would be perceived. A manipulation in form, a representation of what we have seen before, shapes that had been registered in our minds. It helped me find ways to represent and present my work to others. The manipulation of a single plain, transformed into patterns and surfaces. "What other transformations can we think of?" or rather "Can we go beyond the limits?". I might be going off topic, but this is my reflection from this exercise. I think about the transformation we have done in Architecture throughout history. Indeed history is necessary for us to know, so as to not repeat what history had already accomplished. It is crucial, that we think far into the future. Explore the unknown depths, experiment with every possibility. This exercise is all about exploration! Unfortunately, time was my limiting factor, and it goes for everyone else. It is no excuse, as I have seen others, they had achieved better results in the same given amount of time. There is no way one could improve if he only looks from the bottom of the well. Inspire others and be inspired is the way to go.
© 2023 by Fong Wei Jay Ruben. Proudly created with Wix.com